Greetings Crafty Friends!
Today I'm sharing the Pop-Up Box Cards that I made live last night. Up front - I re-designed the traditional Pop-Up Box Cards. A) I'm not a fan of the flaps that hang off of 3 sides. I don't see any real purpose in them. B) I wanted to use 8 1/2" x 11" cardstock. All of the tutorials that I found called for 11 1/2" or 11 3/4" long...that means 12" x 12". Nah. C) I also wanted them to fold flat and fit inside an A2 envelope.
So going with those requirements, I went to the drawing board and did some math to come up with these new style Pop-Up Box Cards. I think they're super cute, and easy enough.
NOTE: I messed up the last one (the graveyard) in the video, so I ripped all my tombstones off and re-made the card just now. Now I love it even more. :)
Just a reminder that I am generally Live on-line every Thursday at 8:00pm ET. I stream to BOTH YouTube and Facebook simultaneously. NOTE: Facebook has been behaving poorly for quite some time, so I recommend viewing on YouTube.
If you are not able to catch me live, you can watch over on YouTube. If the picture does not appear below, you can click HERE to get to it on YouTube.
For all of these cards, you're going to have to watch the video for assembly. I'm providing all of the paper measurements for each, but you have to watch it in action.
First Pop-Up Box Card features the Sunrise Sailing bundle. This card is portrait-oriented. When folded flat, it is 4 1/4" wide x 5 1/2" tall. I die-cut a few of the sailboats, and glued different colored sails on them. Note to self: those tiny sailboat masts are flimsy! Very wobbly when I added the sails.
Paper Measurements:
- Misty Moonlight (base): 3" x 5 1/2"
- Basic White: 2 3/4" x 5 1/4", for back of card to write on
- Thoughtful Journey DSP: 2 3/4" x 5 1/4", and 2 3/4" x 2 3/4" (from same print)
- Misty Moonlight (box frame): 3" x 9", scored at 1 1/4", 4 1/4", 5 1/2", 8 1/2"
- Misty Moonlight (middle/support panels): (2) 3" x 3 1/2", scored at 1/4" from each end on the 3 1/2" side
- Basic White/Basic Black/Misty Moonlight/Night of Navy: scraps to die-cut sailboat pieces and clouds
- Misty Moonlight: scraps to cut approx 1/4" strips, used to attach die-cut sailboats to support panels. You could also use acetate/window sheets, as long as they are thick and sturdy!
Once you build the box card frame, with the support panels in place - use the strips of Misty Moonlight to attach sailboats to support panels. Glue them to the front and back sides of the support panels - place them wherever you want, but try to space them out so you can see them all. You also want to have them at different heights.
I added the larger stamped sailboat and greeting at the end. Finish off with some Low Profile Sparkle Dots in Secret Sea.
Stamps: Sunrise Sailing Bundle
Ink: Secret Sea, Cloud Cover, Early Espresso
Paper: Misty Moonlight, Basic Black, Night of Navy, Thoughtful Journey Designer Series paper
Other: Low Profile Sparkle Dots
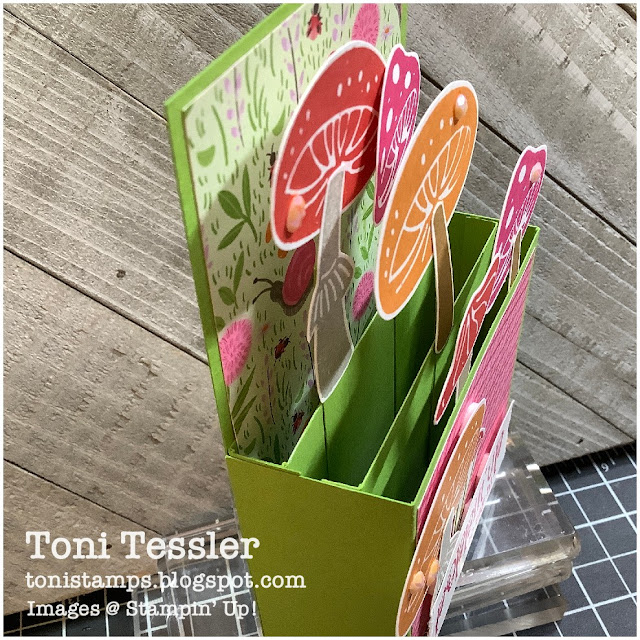
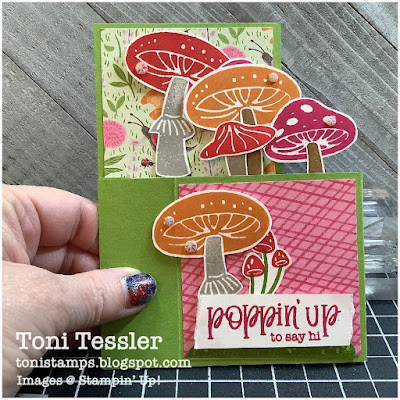
The second Pop-Up Box card is another portrait-oriented card. This time I was trying to add more "things", in this case toadstools. Again - you want to place your things at different heights. It just makes it look more interesting.
Paper Measurements:
- Granny Apple Green (base): 3" x 5 1/2"
- Basic White: 2 3/4" x 5 1/4", for back of card to write on
- Toadstool Gardens DSP: 2 3/4" x 5 1/4", and 2 3/4" x 2 3/4" (from same print)
- Granny Apple Green (box frame): 3" x 9", scored at 1 1/4", 4 1/4", 5 1/2", 8 1/2"
- Granny Apple Green (middle/support panels): (2) 3" x 3 1/2", scored at 1/4" from each end on the 3 1/2" side
- Basic White/Granny Apple Green: scraps to stamp and hand-cut toadstools and the little bit of grass along the bottom of the card front.
- Granny Apple Green: scraps to cut approx 1/4" strips, used to attach toadstools to support panels. Again, you could also use acetate/window sheets, as long as they are thick and sturdy.
Larger picture so you can see down into the card, how I attached the toadstools with the paper strips.
Folded flat to fit in the medium envelope. Pay attention to where your pieces hang off the edges. See how none of the toadstools go past that very right-side edge? Nothing goes up past the top of the card either.
Stamps: Terrific Toadstools
Ink: Pumpkin Pie, Melon Mambo, Poppy Parade, Granny Apple Green, Crumb Cake, Gray Granite, Pecan Pie
Paper: Granny Apple Green, Basic White, Toadstool Gardens Designer Series Paper
Other: Iridescent Faceted Gems
The third Pop-Up Box Card is a cemetery scene and might be my favorite! This one is landscape-oriented. Folded flat, it measures 4 1/4" tall x 5 1/2" wide. I ended up pulling all of my tombstones (Everyday Arches Dies!) off of my original and ink-blending the edges... then I redid the base/box of the card too so that I could ink-blend the embossed edges. Basically a rip & do-over of the whole thing.
I had to re-make the "OCT 31" tombstone because of letter/number placement. I re-stamped with one letter at a time, starting with the "C" and working out. I was able to get them closer that way. The letters and numbers all came from the Month by Month stamps that I got with my Virtual Scrapbooking Retreat kit.
Paper Measurements:
- Gray Granite (base): 4" x 4 1/4"
- Basic White: 3 3/4" x 4", for back of card to write on
- Gray Granite: 3 3/4" x 4", and 1 3/4" x 4", embossed with Exposed Brick folder
- Gray Granite (box frame): 2" x 11", scored at 1 1/4", 5 1/4", 6 1/2", 10 1/2"
- Gray Granite (middle/support panels): (2) 1 7/8" x 4 1/2", scored at 1/4" from each end on the 4 1/2" side
- Gray Granite: enough to die-cut as many tombstones as you want.
- Basic White: scraps to stamp and hand-cut bats
This time, I did not use any 1/4" strips to attach the tombstones. They were long enough on their own to just glue directly to the support panels.
Folded flat, to fit in a medium envelope. Again, notice how I hang the tombstones off edges, but still within the size of an A-2 card.
Stamps: Party Celebrations, Month by Month, Throughout the Year, Terrific Toadstools
Ink: Basic Gray, Tuxedo (Memento)
Paper: Gray Granite
Other: Everyday Arches dies, Exposed Brick embossing folder, Sparkle Gems
I hope you love these re-designed Pop-Up Box cards as much as I do! I can't wait to see what you all create.
Thanks for visiting, and Happy stamping!
Toni
Shop here for your Stampin' Up products, 24/7. Thank you for your support!
*NEW* Toni's Amazon Store - shop for my favorite crafting items
Paper Pumpkin Monthly Craft Kits
Facebook Page: @tonistampsandmore
Facebook Sharing Group: Toni's Stamping & Sharing Group
Instagram: tonistampsandmore
Pinterest: tonistamps
YouTube Channel: tonistamps
#tonistamps #stampinup #freeclass#popupboxcard


Beautiful work!
ReplyDelete