Hello Crafty Peeps!
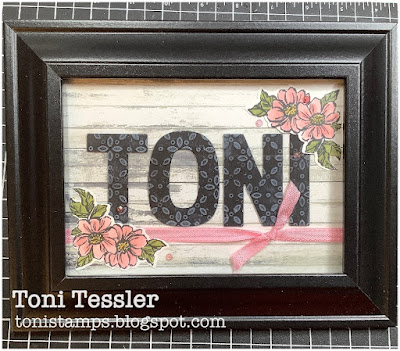
Tonight's projects were FUN and definitely something that you can customize for a special someone. YOU count as a special someone too! I have a lot of "favorite projects", but this is definitely high up on the list. I've had one on my desk for years and years, and it was definitely in rough shape. I made an updated frame for ME, and then the other one is for a friend's new nephew. I will change that frame out though. I only had these two frames in my stash, and the long one just doesn't fit the "baby room vibe". The important part is the insert! I love how these turned out!
Just a reminder that I am generally Live on-line every Thursday at 8:00pm ET. I stream to BOTH YouTube and Facebook simultaneously. NOTE: Facebook has been behaving poorly for quite some time, so I recommend viewing on YouTube.
If you are not able to catch me live, you can watch over on YouTube. If the picture does not appear below, you can click HERE to get to it on YouTube.
The concept for this project is very simple. Take an ordinary picture frame (I get mine at Walmart and/or Michael's), and take the stock photos and photo mat OUT. Cut a piece of whiteboard, cereal box, lightweight chipboard...even a piece of cardstock - this should be the same size as the photo mat that you pulled out. This is your base. Cover with cardstock/designer series paper and decorate to your liking.
Once you have your base ready, add your letters. I used the HUGE Party Alphabet dies for these frames. I like how big they are, but you can use any alphabet dies OR stamp the letters on individual panels of cardstock and layer. Check out this one that I made in 2011 using alphabet stamps. Lots of possibilities!
I'm not going to give cardstock measurements for these because it's truly dependent on the frame that you have.
I wanted my letters to be a little sturdier so I cut and glued together two layers of cardstock letters, then glued the final layer on top. For MY name frame, I cut all three layers of letters out of Basic Black cardstock, and embossed that final layer with the Eyelet folder before gluing on top.
GENTLY rub a White Craft ink pad across the raised embossed pattern. If you had Two-Tone cardstock, you could use a sanding block on the embossed part to reveal the white core. I didn't have any Two-Tone Black.
Close-up doesn't show the shimmer on the flowers very well, but then again - I do still need to clean the glass on this frame.
Stamps: Gallery Blooms
Ink: Tuxedo Memento, White Craft
Paper: Basic Black, Country Woods Designer Series Paper
Other: Party Alphabet dies, Eyelet embossing folder, Stampin' Blends (Pretty in Pink/Flirty Flamingo/Old Olive/Daffodil Delight), Pretty in Pink ribbon, Clear Wink of Stella, Pretty in Pink/Strawberry Slush Gems
This long one is for a new baby's room. I cut the letters from the Storybook Moments papers, trying to get some of the cute critters in where I could. Two layers of Pecan Pie cardstock layers glued together for the base, then glue on the DSP letters.
Once I glued the letters to the base, I added some Crumb Cake layers of dirt. Ripped Crumb Cake cardstock, and then direct-to-paper swiped Crumb Cake ink along the ripped edge.
Close-up to see some of the details. I added some of the ephemera pieces from the paper pack to build a cute scene. Add a few Brass Butterflies too. They're flat - perfect!
Stamps: NONE
Ink: Crumb Cake
Paper: Pecan Pie, Crumb Cake, Storybook Moments Specialty Designer Series Paper
Other: Party Alphabet dies, Brass butterflies
I really hope that you will make one of these frames. I'm sure you've got plenty of paper to choose from! :)
Join me next week for some really cool Box Cards!
Thanks for visiting, and Happy stamping!
Toni
Shop here for your Stampin' Up products, 24/7. Thank you for your support!
*NEW* Toni's Amazon Store - shop for my favorite crafting items
Paper Pumpkin Monthly Craft Kits
Facebook Page: @tonistampsandmore
Facebook Sharing Group: Toni's Stamping & Sharing Group
Instagram: tonistampsandmore
Pinterest: tonistamps
YouTube Channel: tonistamps
#tonistamps #stampinup #freeclass #homedecor #frameart #nameframe


No comments:
Post a Comment