
Greetings Crafty Friends!
I had a great time sharing these ideas live on Thursday night. I REALLY love all of them. I'm glad that my friend Rose convinced me to get that Pumpkin punch after all. It's adorable, and useful even on it's own. These projects get me in the Fall-y mood a little bit more. We still don't have Fall temperatures or weather where I am in Maryland....yet. Fingers crossed that it gets here soon. In the mean time, I'll have to make myself happy with Fall projects!
Just a reminder that I am generally Live on-line every Thursday at 8:00pm ET. I am streaming to BOTH YouTube and Facebook simultaneously.

If you are not able to catch me live, you can watch over on YouTube. If the picture does not appear below, you can click HERE to get to it on YouTube.
My first project is a beautiful card in what I call "Judy's Fall Palette". My mom was NOT into traditional fall colors like I am. She leaned more towards the pastels. Ideally, I would have used Pale Papaya, but we don't have that current anymore. So Petal Pink and Pool Party work, and she would have loved this combo. Very simple stamping, and layering.
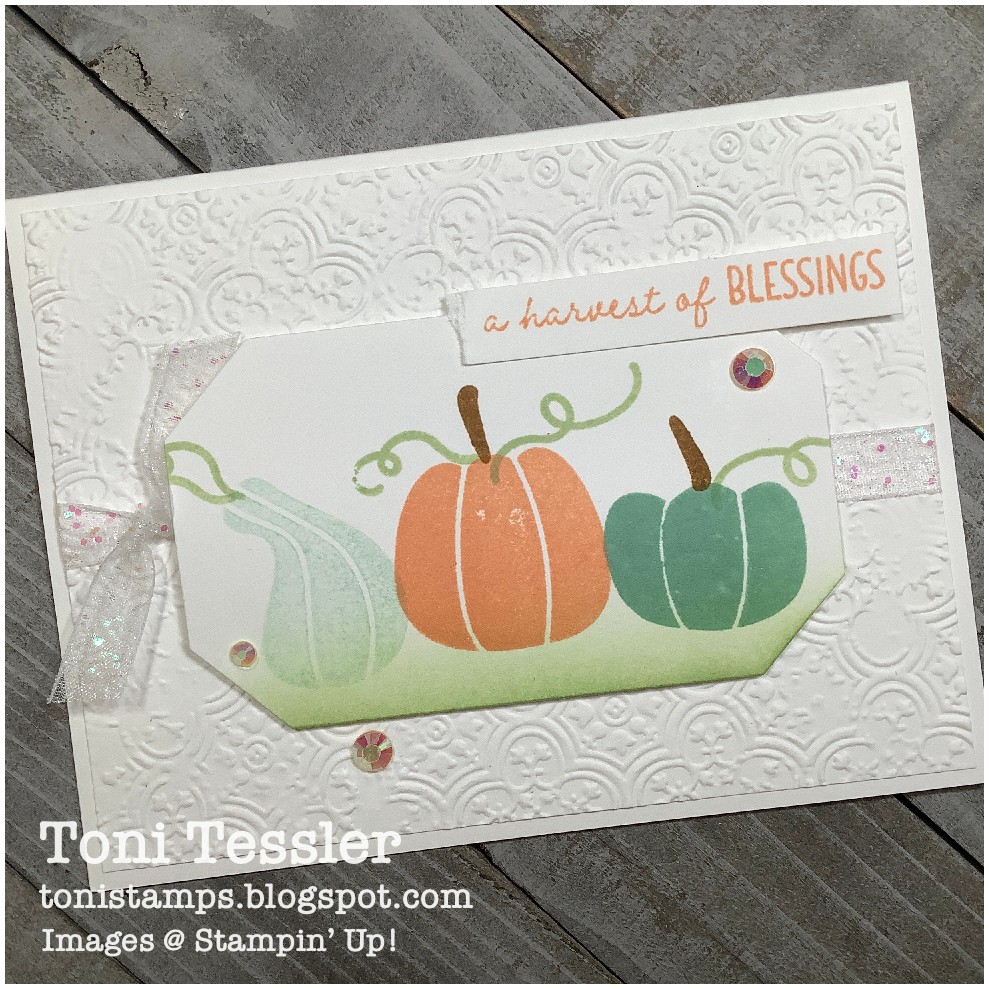
Paper measurements:
- Basic White Thick: 5 1/2" x 8 1/2", scored and folded at 4 1/4"
- Basic White: 4" x 5 1/4", embossed with Distressed Tile folder
- Basic White: 2 1/2" x 4 1/4", cut with Countryside Corners dies
- Basic White: scrap to stamp and hand-cut greeting
Tie some White 3/8" Glittered Organdy ribbon around the embossed layer first, then glue down to the card base. Add the stamped on pumpkin layer with Stampin' Dimensionals.
Stamps: Pick of the Patch
Ink: Petal Pink, Pool Party, Soft Seafoam
Paper: Basic White (Thick and regular)
Other: Countryside Corners dies, White 3/8" Glittered Organdy ribbon, Iridescent Pastel Gems
The second card is a tone-on-tone situation. I couldn't decide between Lost Lagoon and Copper Clay...I ended up with Lost Lagoon. These Tartan Foil papers are SO pretty in real life. Shiny and smooth. One side is the tone-on-tone plaid, and the other is white/color plaid.
All I did here is punch out some pumpkins (2 each, glued together), and added a bunch of layers. The middle layer is popped up. I couldn't decide on a greeting, and I didn't want to ruin it - so I left one off. I'll stamp whatever I decide on the inside.

Paper measurements:
- Lost Lagoon: 5 1/2" x 8 1/2", scored and folded at 4 1/4"
- Basic White: 4" x 5 1/4", for inside of card
- Lost Lagoon: 4" x 5 1/4"
- Tartan Foil (Lost Lagoon): 3 7/8" x 5 1/8"
- Lost Lagoon: 2" x 4 1/2"
- Tartan Foil (Lost Lagoon/White): 1 7/8" x 4 3/8"
- Pecan Pie: scraps to punch out pumpkin stems
- Tartan Foil (Lost Lagoon): enough to punch out pumpkins
I wanted to add some bling, so I went with Iridescent Rhinestones. I thought I had some Lost Lagoon gems, but couldn't find any.
Stamps: NONE
Ink: NONE
Paper: Lost Lagoon, Basic White, Tartan Foil Specialty paper
Other: Pick of the Patch Builder punch, Iridescent Rhinestones
The third project is a CUTE little stand-up project that I think is perfect for table/place settings or to hold a recipe. Could also clip in a picture to display! There's a mini clothespin glued to the back of the largest leaf, facing up.
I added another leaf, and pumpkin. Finished off with some Speckled Dots. Very cute and tiny. You could try with a bigger (regular size) clothespin - just find a die-cut shape that is big enough to HIDE the clothespin. You don't want to see it from the front.

Paper measurements:
- Crushed Curry: scraps to die cut two leaves from Aspen dies. Glue together.
- Pecan Pie: scrap to die cut leaf from Autumn Leaves dies, punch out pumpkin stem
- Basic White: scrap to stamp/punch out pumpkin and leaf
See themini clothespin on the back, so it stands up.

Think of all your punches and dies...what could you use to make something similar? Change it up for the season, and go with a green leaf and ladybug!!! I think I'll do that tomorrow!
Stamps: Pick of the Patch
Ink: Pumpkin Pie, Old Olive
Paper: Crushed Curry, Pecan Pie, Basic White
Other: Aspen dies, Autumn Leaves dies, Pick of the Patch Builder punch, Speckled Dots
The last project is a fun little mini picture frame that I got from Michael's. I'm sure you can find these at the Dollar Store or Walmart too - even pharmacies if you're desperate. :) It's a 3" x 3" frame. I took the glass out, and added two layers of chipboard (to be the same size/thickness as the glass) behind that burlap frame. The burlap frame was included in this picture frame.
I glued a scrap of All About Autumn Designer series paper directly to the chipboard. Then glue the burlap frame on top of all that. Load into your frame, and you've got your base.

Paper measurements:
- Tartain Foils (Copper Clay): scraps. Punch out TWO pieces and glue together
- Early Espresso: scrap to punch out pumpkin stem
- Very Vanilla: scrap to die cut banner for greeting
Pop the Copper Clay pumpkin up in the bottom corner, and the greeting in the right corner. I added glue to the right-side edge of the greeting and slid it under the frame as far as it would go.
I can't believe I didn't put any gems on this!
I love the idea of customizing this project. Instead of a greeting or message that makes you happy, you could add a name (stamp with SMALL stamps, print on the computer, or write very small). Sit this on your desk, or somewhere you'll see it every day.
Stamps: Trucking Along
Ink: Early Espresso
Paper: Early Espresso, Very Vanilla, Tartan Foil (Copper Clay), All About Autumn Designer Series Paper
Other: Pick of the Patch Builder Punch, Nested Essentials dies, Mini picture frame (Michael's)
Maybe you have some old picture frames laying around that you could re-purpose. Think about it.
NOTE: This coming week, I will be Live on WEDNESDAY! We have a concert to go to, so I have to change things up. This will also be my October Workshop, and my projects will feature different TREES that I have.
Thanks for visiting, and Happy stamping!
Toni
Shop here for your Stampin' Up products, 24/7. Thank you for your support!
Paper Pumpkin Monthly Craft Kits
Facebook Page: @tonistampsandmore
Facebook Sharing Group: Toni's Stamping & Sharing Group
Instagram: tonistampsandmore
Pinterest: tonistamps
YouTube Channel: tonistamps
#tonistamps #stampinup #pickofthepatch #aspendies #clothespin
Gift certificates available anytime!
No comments:
Post a Comment