Hi Crafty Friends! This post has all of the cards from BOTH class videos. My goal with this online class is to help you get your Christmas Cards created with plenty of time to send them out this year.
All the prep work is done for you! There's minimal stamping, and it's mostly assembly. There is also no embellishment included with this class - this allows me to ship these kits out faster (don't have to wait for an order to arrive) and you get to use up what's in your stash!
You'll make (8) different cards in this class. Envelopes are included. Each day's cards feature beautiful, but different papers and colors.
Here are the cards -
NOTE: I usually do not provide measurements for my online classes, but this is a special, quick release class and I am not making a PDF...so enjoy!!!
First card showcases the beautiful poinsettia print designer series paper. This is the larger print. I wanted that to be the focus of this card, so all we're adding is some ribbon and a stamped greeting. Greeting is popped up as well as the entire front layer.
Paper measurements:
- Garden Green: 5 1/2" x 8 1/2", scored and folded in half at 4 1/4"
- Garden Green: 4" x 5 1/4"
- Very Vanilla: 4" x 5 1/4" (for inside of card)
- Boughs of Holly Designer Series paper: 3 7/8" x 5 1/8"
- Garden Green: 2 1/2" circle
- Old Olive: 2 1/4" circle
Finish off with some Gold Swirls.
Stamps: Framed & Festive
Ink: Garden Green
Paper: Garden Green, Very Vanilla, Boughs of Holly Designer series paper
Other: 2 1/4" and 2 1/2" circle punches, Gold & Vanilla 3/8" Satin Edge ribbon, Gold Swirls
Paper measurements:
- Cherry Cobbler: 5 1/2" x 8 1/2", scored and folded in half at 4 1/4"
- Real Red: 4" x 5 1/4"
- Basic White: 4" x 5 1/4", for inside of card
- Boughs of Holly Designer Series paper: 3 7/8" x 5 1/8"
- Poppy Parade: 2" x 4", cut with Seasonal Labels dies
- Real Red: scraps to die cut poinsettias
Greeting is stamped on Poppy Parade, with Cherry Cobbler ink - so it's darker.
Finished off with some regular rhinestones.
Stamps: Framed & Festive
Ink: Cherry Cobbler
Paper: Cherry Cobbler, Real Red, Poppy Parade, Basic White, Boughs of Holly Designer series paper
Other: Merriest Frames dies, Seasonal Labels dies, Basic Rhinestones
Our third card is a WOW, but simple. The Copper foil really makes this one stand out. The Merriest Frames Hybrid folder/dies really does all the work here (HINT: this hybrid folder/dies set will be on sale 60% off on December 1st!). I've got a different fold for the base, which adds a little more interest.
I embossed the greeting with Copper embossing powder to tie in with the foil.
Paper measurements:
- Shaded Spruce: 4 1/4" x 11", scored at 2", and 7 1/2"
- Copper Foil: 4 1/4" x 5 1/2", cut with Merriest Frames die/embossed with folder
- Copper Foil: 1" x 4 1/4"
- Very Vanilla: 4" x 5 1/4", for inside of card
- Very Vanilla: 3" x 4", cut with Merriest Frames dies
Picture of the card open - the bottom flap opens to reveal the 4" x 5 1/4" Very Vanilla inside the card.
Stamps: Merriest Moments
Ink: Versamark
Paper: Shaded Spruce, Very Vanilla, Copper Foil
Other: Merriest Frames dies, Champagne Rhinestones, Metallics embossing powder (Copper)
The last card for Day 1 showcases another pattern from the Boughs of Holly paper pack. These poinsettias are hand-cut from the paper, and popped up. Greeting is stamped on Old Olive cardstock, using Evening Evergreen ink. I like it!
- Evening Evergreen: 5 1/2" x 8 1/2", scored and folded in half at 4 1/4"
- Evening Evergreen: 4" x 5 1/4", cut with Greenery die
- Basic White: 4" x 5 1/4', for inside of card
- Garden Green: 2" x 3", cut with He's All That dies
- Boughs of Holly Designer Series paper: 2" x 5 1/4"
Finish with some Red Rhinestones!
Stamps: Merriest Moments
Ink: Evening Evergreen
Paper: Evening Evergreen, Garden Green, Basic White, Boughs of Holly Designer series paper
Other: He's All That dies, Red rhinestones
Watch the video from Day 2 - click HERE if there is no video below.
Snowflake is glued on the square layers, and that's all popped up. I used a post-it note to mask off the stamp, so I could get just the words "Tis the Season". Stamp that in Fresh Freesia.
Paper measurements:
- Smoky Slate: 5 1/2" x 8 1/2", scored and folded in half at 4 1/4"
- Cottage Gingham Designer Series Paper (Smoky Slate print): 4" x 5 1/4"
- Basic White: 4" x 5 1/4', for inside of card
- Basic White: 3" x 3"
- Smoky Slate: 2 3/4" x 2 3/4", embossed with Brick & Mortar folder
- Basic White/Smoky Slate: scraps to stamp/punch greeting
Finished off with some Adhesive-Backed Sequins & Gems - the Fresh Freesia sequins are perfect!
Stamps: Framed & Festive
Ink: Fresh Freesia
Paper: Smoky Slate, Basic White, Gingham Cottage Designer series paper
Other: Wonderful Snowflake, Double Oval punch, Brick & Mortar embossing folder, Fresh Freesia Stampin' Blends, Adhesive Backed Sequins & Gems
Next up, you'll build your own snowman out of circle punches. Hand-cut and build the hat from Black scraps. I wanted the focus to stay on the gorgeous Snowflake Vellum. This iridescent pattern is so pretty! Layer it directly on the same size piece of Basic White, so it really stands out.
Paper measurements:
- Tahitian Tide: 5 1/2" x 8 1/2", scored and folded in half at 4 1/4"
- Basic White: 4" x 5 1/4" (2 pieces, one to mount vellum on, one for inside of card)
- Snowflake Specialty Vellum: 4" x 5 1/4"
- Basic White: 2" and 2 1/2" circles
- Basic Black/Pumpkin Pie/Basic White: scraps to hand-cut and build carrot, hat, and greeting strip.
Add some Gold Holly Leaves and Red Rhinestons to the hat. Finish off with Classic Matte Dots in black for his eyes and mouth.
Greeting is popped up, but nothing else.
Stamps: Ringed with Nature
Ink: Tahitian Tide
Paper: Tahitian Tide, Basic White, Basic Black, Pumpkin Pie, Snowflake Specialty Vellum
Other: 2" & 2 1/2" circle punches, Gold Holly Leaves, Red Rhinestones, Classic Matte Dots
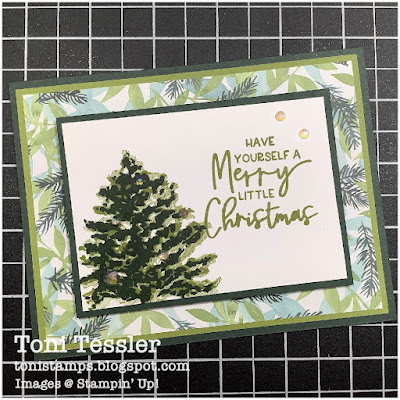
Card #3 goes to a more traditional tree theme in Old Olive and Evening Evergreen. Simple background of Painted Christmas Designer Series paper layered on to Old Olive. Tree is a two-step stamp done in Old Olive and Evening Evergreen.
Paper measurements:
- Evening Evergreen: 5 1/2" x 8 1/2", scored and folded in half at 4 1/4"
- Old Olive: 4" x 5 1/4"
- Painted Christmas Designer Series Paper: 3 7/8" x 5 1/8"
- Basic White: 4" x 5 1/4", for inside of card
- Evening Evergreen: 3" x 4 1/4"
- Basic White: 2 3/4" x 4"
Finish off with plenty of Iridescent Rhinestones, and pop that greeting/tree layer up.
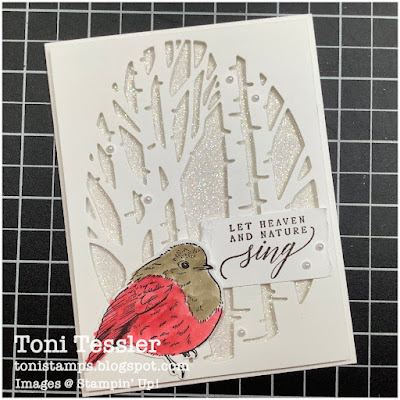
Last card is probably my favorite. All this stark white and GLITTERY paper is so sparkly and pretty!!! I also give a demonstration of how I watercolor on regular Basic White Thick cardstock. You probably can't tell, but I did pounce my Clear Wink of Stella pen all over my birdie.
Paper measurements: (everything for this card was cut from a sheet of Basic White Thick)
- Basic White Thick: 5 1/2" x 8 1/2", scored and folded in half at 4 1/4"
- Basic White Thick: 4" x 5 1/4"
- Diamond Glitter paper (could use White Glimmer paper that is newer if you have it): 3 7/8" x 5 1/8"
- Basic White Thick: 4 1/4" x 5 1/2", notched corner to stamp/cut out bird and greeting
I watercolored the bird with Sweet Sorbet and Crumb Cake.
Finish with some Iridescent Pearls!
Stamps: Perched in a Tree bundle
Ink: Midnight (Catherine Pooler), Early Espresso, Sweet Sorbet, Crumb Cake
Paper: Basic White Thick, Diamond Glitter paper
Other: Aspen dies (comes in the bundle above), Clear Wink of Stella marker, Iridescent Pearls
I hope you enjoy this class, and are inspired to get cracking on your own holiday cards! Let me help you out with this kit.
Note: I will not be Live THIS Thursday. Might be on next Tuesday...Thursday is my normal Live day, but I may be exhausted after Thanksgiving. :)
Thanks for visiting, and Happy stamping!
Toni
Shop here for your Stampin' Up products, 24/7. Thank you for your support!
Paper Pumpkin Monthly Craft Kits
Facebook Page: @tonistampsandmore
Facebook Sharing Group: Toni's Stamping & Sharing Group
Instagram: tonistampsandmore
Pinterest: tonistamps
YouTube Channel: tonistamps
#tonistamps #stampinup #christmascardclass
Gift certificates available anytime!


No comments:
Post a Comment