Happy Friday Crafty Friends! Last night, I demonstrated this great project and I am thrilled to offer you this gift set as an additional freebie for my Workshop of the Month (October). What does that mean???
When you place your online order (at least $50 before shipping/tax), and use the Hostess Code (QYTVEG3V), you're going to receive the Make-n-Take packet for my October 2021 Workshop, along with a free pack of the Gold Holly Leaves embellishments, AND one of these beautiful In Color gift sets of notecards and envelopes. The Ombre bag/tag color that you get will be random, but they're all so pretty!
If the picture does not appear below, you can click HERE to get to it on YouTube.
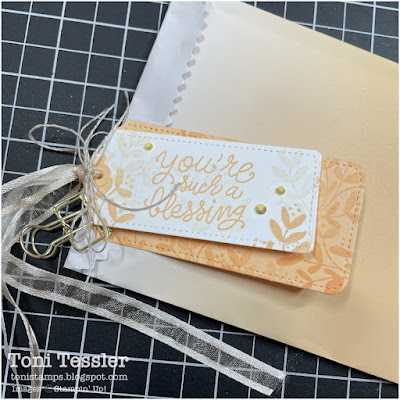
I started off making the tag that gets clipped on to the Ombre Gift Bag. Since the Ombre Gift Bags come in the In colors, the tags will match the bag, and the ribbon, and the bling... :)
The tag comes together very quickly. I made a layered tag, using the same In Color as the bag, and then a smaller white layer. The two tags are not glued together - just held together with the ribbon.
LOTS of ribbon! In Color Open Weave ribbon, White Crinkled Seam binding, and then some Linen Thread thrown in. Matching In Color Jewels finish the tag, and it's attached to the bag with a gold clip (retired).
The set of note cards comes together just as easily. I'm only doing a little bit of stamping, adding a tiny strip of designer paper, a greeting and some jewels. Each card shows off ONE In Color. I didn't pop anything up either. The note cards are a fairly tight fit in their envelopes, so I wanted to keep them flat.
In the video, I show some neat ways you can use the Postage Stamp punch to change the size/shape of your punch out. In this picture, I used it on the Ho Ho Ho card to make a postage square.
On the Christmas card here, I used the Postage Stamp punch to cut off just the ends so that it looks like a ticket. Pretty cool!
Paper measurements:
- Basic White Notecards and envelopes: (5)
- In Color Ombre Gift Bag: (1)
- 2021-2023 In Color cardstock: 2 1/2" x 4", to cut with Tailor Made Tags dies
- Basic White: 2 1/2" x 4", to cut with Tailor Made Tags dies
- 2021-2023 In Color Designer Series Paper: (5 pieces, 1 in each color) 3/4" x 4"
- Basic White: 5 1/2" x 8 1/2", to stamp all greetings
Stamps: Little Delights
Ink: Evening Evergreen, Fresh Freesia, Pale Papaya, Polished Pink, Soft Succulent
Paper: Basic White Notecards/envelopes, 2021-2023 In Color Designer series paper
Other: Ombre Gift Bags, In Colors 3/8" Open Weave Ribbon, White 1/4" Crinkled Seam Binding, Linen Thread, Everyday Label punch, Large Postage stamp punch, In Color Jewels
Reminder - don't forget about my October Workshop, for your opportunity to get some free Gold Holly Leaves ALONG with this gift set (random color bag). Check out my Workshop of the Month page for all the details!
Thanks for visiting, and Happy stamping!
Toni
Shop here for your Stampin' Up products, 24/7. Thank you for your support!
Paper Pumpkin Monthly Craft Kits
Facebook Page: @tonistampsandmore
Facebook Sharing Group: Toni's Stamping & Sharing Group
Instagram: tonistampsandmore
Pinterest: tonistamps
YouTube Channel: tonistamps
#tonistamps #littledelights #ombregiftbags
Gift certificates available anytime!


No comments:
Post a Comment