Happy Sunday Crafty Folks!
I just got home from a concert, and wanted to get this blog updated for you since I have two rounds of play-offs with pool tomorrow. Wish me luck! :) Anyway - let's get to these projects. I had forgotten how fun these little books are to make! I made some maybe 16 or so years ago. Squash Books are good for ANY occasion, and you can make yours bigger by adding more "squashes". I made two different sizes - 4" x 4" finished, and 6" x 6" finished. I wanted you to see some differences between using regular cardstock and Two-Tone cardstock (which is much thinner and lighter weight than regular cardstock).
The fun part is when you fold them all up. It's kind of like an accordian.
Just a reminder that I am generally Live on-line every Thursday at 8:00pm ET. I stream to BOTH YouTube and Facebook simultaneously. NOTE: Facebook has been behaving poorly for quite some time, so I recommend viewing on YouTube.
If you are not able to catch me live, you can watch over on YouTube. If the picture does not appear below, you can click HERE to get to it on YouTube.
First Squash book is made using regular cardstock. The main thing about squash books is that you want to start with a square piece of paper. You score/fold the paper in half top/bottom, and left/right. Then score/fold it in half diagonally. No matter what size paper you use! So I started out with 8" x 8" Pretty in Pink cardstock here, and I made three squashes.
I ended up using the Wildflower Birthday designer series paper for the front cover ephemera, and the inside page layers. I didn't put anything but DSP on the inside bits. I really prefer to add my pictures and journaling before I add any extra bits and pieces.
Paper Measurements:
- Pretty in Pink: (3) 8" x 8"
- Pretty in Pink/Front & Back Covers: (2) 5" x 5", scored at 1/2" on all 4 sides.
- Pretty in Pink/Front & Back Cover layers: (2) 3 3/4" x 3 3/4", embossed with Forever Plaid folder
- Wildflower Birthday DSP: (4 different prints) 3 3/4" x 3 3/4"
- Wildflower Birthday DSP: (6 prints) 3 5/8" x 3 5/8", cut in half diagonally
For the Front & Back Cover pieces, I mitred all the corners and folded those 1/2" sides in. This just makes a more finished cover, rather than just cutting a piece of cardstock 4" x 4". The edges look nicer, when you do it this way. I did NOT do this for the covers on the second squash book, but I wanted you to see the difference.
Squash Book opened up - see how you've got the four full squares across the middle, then the diagonal cuts top and bottom. I chose to keep each set of triangles consistent, but you could mix them up.
Back Cover shows how the ribbon wraps from around the front cover. It's only attached underneath the front cover.
Stamps: None
Ink: None
Paper: Pretty in Pink, Wildflower Birthday Designer Series Paper
Other: Forever Plaid embossing folder, Pretty in Pink ribbon
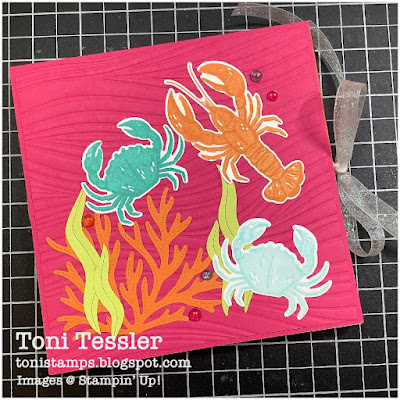
The second squash book features the Ocean Friends suite of products. I used the designer series papers, embossing folder, stamped/die-cut images, and the gems (that are no longer available, boo....). This one is 6" x 6" finished. I used 12" x 12" Two-Tone cardstock as the base.
You may notice that the cover is Melon Mambo, but the squash base pages are Pumpkin! (if you watch the video, you'll notice that.)
Paper Measurements:
- Pumpkin Two-Tone cardstock: 12" x 12"
- Melon Mambo/Front & Back Covers: (2) 6" x 6"
- Melon Mambo/Front & Back Cover layers: (2) 5 3/4" x 5 3/4", embossed with Soft Waves folder
- Friends of the Ocean DSP: (4 different prints) 5 3/4" x 5 3/4"
- Friends of the Ocean DSP: (6 prints) 5 5/8" x 5 5/8", cut in half diagonally
- Pumpkin Pie/Lemon Lime Twist: scraps to die-cut sea stuff
- Basic White: scraps to stamp/die-cut some crabs and lobster
6" x 6" is the largest size you can make a Squash Book in. When you glue three of these together....it's a pretty big mini album. So much more room for photos and journaling! Can you see how you can add MORE squashes and this album just keeps growing...? Fun! Lots of opportunities!
Picture of the back too - again, I've got the ribbon secured underneath the Front cover and it wraps around the back side freely.
Stamps: Ocean Friends Bundle
Ink: Summer Splash, Pool Party, Pumpkin Pie
Paper: Melon Mambo, Lemon Lime Twist, Pumpkin Pie, Basic White, Friends of the Ocean Designer series paper
Other: Soft Waves embossing folder, White Glittered Organdy Ribbon, Sunny Days gems
I really hope you decide to give one of these little books a try! I think you will be happily surprised. These really do work for any occasion you can think of.
This Thursday, I'll be working with the Round We Go bundle. I just got it last week.
Don't forget! The NEW 2025-2026 Annual Catalog and NEW Online Exclusives go LIVE this Tuesday, May 6th!
Thanks for visiting, and Happy stamping!
Toni
Shop here for your Stampin' Up products, 24/7. Thank you for your support!
*NEW* Toni's Amazon Store - shop for my favorite crafting items
Paper Pumpkin Monthly Craft Kits
Facebook Page: @tonistampsandmore
Facebook Sharing Group: Toni's Stamping & Sharing Group
Instagram: tonistampsandmore
Pinterest: tonistamps
YouTube Channel: tonistamps
#tonistamps #stampinup #freeclass #squashbook #minialbum #tutorial


No comments:
Post a Comment