Good afternoon Crafty Friends! I hope you're enjoying this holiday weekend. I will definitely enjoy doing much of NOTHING tomorrow. :) But now, I'm sharing the altered paper clips that I made live Thursday night. I made three different styles, but there are a LOT more ways to alter paper clips. These are just my favorites, and the last one was really brand new to me.
My desire to share some altered paper clips goes back to my video from two weeks ago, when I altered a half-composition book. Whenever I alter a notebook of any kind, I like to make a coordinating paper clip or two for it.
The paper clips that I used are larger than average paper clips. Adjust any measurements here to the size of YOUR paper clips.
Just a reminder that I am generally Live on-line every Thursday at 8:00pm ET. I stream to BOTH YouTube and Facebook simultaneously.
If you are not able to catch me live, you can watch over on YouTube. If the picture does not appear below, you can click HERE to get to it on YouTube.
Let me first say that you should really watch the video to see how I assemble these paper clips. All three are different.
The first altered paper clip is intended to go in my Altered Half-Composition notebook that I made two weeks ago. I pulled the same colors and some scraps of the same designer series paper to coordinate. I wanted to keep with the "leaves" theme that I had with the notebook, but I didn't have any leaves that were small enough. Luckily, I had a leaf border punch from EK Success that was perfect.
Paper Measurements:
- Pebbled Path base: 1 5/8" x 4-5"ish, folded in half
- Country Woods DSP: scraps
- Petal Pink/Pool Party/Basic White: scraps to punch out and stamp/cut greeting
Finish off with some Petal Pink Foiled Gems,
Stamps: Friends for Life, Itty Bitty Backgrounds
Ink: Pebbled Path, Misty Moonlight
Paper: Pebbled Path, Petal Pink, Pool Party, Basic White, Country Woods Designer Series Paper
Other: Petal Pink Foiled Gems
The second altered paper clip completely hides the paper clip. The paper clip is actually sandwiched between two pieces of Crumb Cake. Again, watch the video for assembly.
You'll want to stamp the outer piece of Crumb Cake before gluing it over the paper clip and inside piece of card stock. Also, if you want to add that little bulb pin(or even an eyelet), I suggest you punch a tiny hole BEFORE gluing also. I had to use my poker tool, because I couldn't get my punch in there.
I just happened to have this adorable little bee charm on hand, but you could add beads or other charms, even ribbon to your tiny bulb pin.
Paper Measurements:
- Crumb Cake: (2) 1 3/4" x however long you want (folded in half) - I really didn't measure these when I was making it. I just cut to fit my paper clip.
- Very Vanilla/Crumb Cake: scraps for greeting
The back is also stamped and has the same double stack of ribbon.
Stamps: Queen Bee
Ink: Crumb Cake, Tuxedo (Memento)
Paper: Crumb Cake, Very Vanilla
Other: Gold Foiled Gems, Scalloped Victorian Lace, bulb pin, bee charm
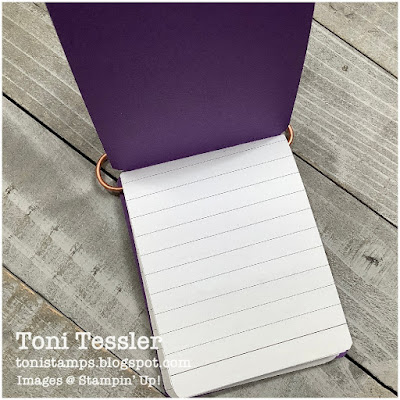
The last paper clip is actually a Mini Journal Altered paper clip. Something popped up in my FB feed last week from the Paper Outpost, so I went to her channel to see what it was all about. OMG! So cute! It's a gigantic (3" wide) paperclip that I got from my Mom's stash, with a teeny tiny journal hanging from it. I love it so much!
Mini Journal finished size is 2 3/4" x 3 3/8".
I think this one might be my favorite so far. I did a little stamping on the base, added just a scrap of Perennial Lavender designer series paper, and a die-cut butterfly that I had left over. Use any butterfly or bird that you have.
Paper Measurements:
- Gorgeous Grape: 2 3/4" x 6 3/4", folded in half
- notebook/copy paper: 2 1/2" x 6 1/2", folded in half
- Perennial Lavender designer series paper: scrap
- Basic White: scrap to stamp/die-cut butterfly
Look at the inside - you use notebook or copy paper to make your pages. Fold over and staple in the middle.
Finished with a bunch of the Purple Fine Shimer gems, and hit the butterfly with Clear Wink of Stella.
Stamps: Queen Bee, Butterfly Brilliance
Ink: Highland Heather, Gorgeous Grape, Midnight (Catherine Pooler)
Paper: Gorgeous Grape, Basic White, Perennial Lavender designer series papers
Other: Purple Fine Shimmer Gems, giant paper clip
I hope you love these paper clip projects! I think they're a neat addition to any journal, notebook, or scrapbook.
Check out my Amazon Store link below. I've got items in there that I love and use regularly. The Corner Chomper that I used on the mini journal is in there.
This coming Thursday, I'll be presenting my September Virtual Workshop featuring the Changing Leaves bundle. You should be able to copy my designs with any leaf stamps that you have in your stash. Tune in live at 8pm ET, or watch later.
Thanks for visiting, and Happy stamping!
Toni
Shop here for your Stampin' Up products, 24/7. Thank you for your support!
*NEW* Toni's Amazon Store - shop for my favorite crafting items
Paper Pumpkin Monthly Craft Kits
Facebook Page: @tonistampsandmore
Facebook Sharing Group: Toni's Stamping & Sharing Group
Instagram: tonistampsandmore
Pinterest: tonistamps
YouTube Channel: tonistamps
#tonistamps #stampinup #virtualstampingworkshop #alteredpaperclips #minijournalpaperclip #hiddenpaperclips
Gift certificates available!


No comments:
Post a Comment