Hello Friends!
Welcome to my Third Annual Fundraiser for the Wreaths Across America! I am once again using my November Virtual Workshop to raise funds and sponsor wreaths. I will be donating 25% of all sales (before tax/shipping), from all orders placed using the November Hostess Code, to the Wreaths Across America. I will also match that with a personal donation, so they get DOUBLE the amount of wreaths.
My official WAA group is registered with the Crownsville National Cemetery, here in Maryland. www.wreathsacrossamerica.org/MD0520
That's where my dad is buried, and Dave's parents are over at Arlington. Last year, the Crownsville Cemetery had the HIGHEST total of wreaths sponsored in Maryland. I can't find the email that I got now, but I think it was 99% sponsored! That's amazing, but it takes all of us to make it happen.
You can help my fundraiser in two ways:
1. Make a direct donation to Wreaths Across America via my official "ToniStamps Wreaths Fundraiser" group link - http://www.wreathsacrossamerica.org/MD0520 My Group is registered with the 3 for 2 program, which means for every TWO wreaths that we sponsor, we get an extra wreath for free. So, 3 wreaths for the price of 2. I have set a goal of 100 wreaths.
2. Make Stampin' Up purchases using the November Code (YFGJEP46). I am donating 25% of these sales to Wreaths Across America. You will still get the Make-n-Take kit for this month's projects, along with (5) cards from my stash. There is no extra freebie this month, because I'm using that $$ to give away.
Now let's talk about this month's Workshop. It's all about gift card holders! Gift cards are the easiest thing in the world to give someone, but presentation is most often severely lacking. Sure, you can just tape it inside a card (my mom's favorite delivery method), OR you can make a fun and/or interesting package for it. That's what we're doing this month.
Just a reminder that I am generally Live on-line every Thursday at 8:00pm ET. I am streaming to BOTH YouTube and Facebook simultaneously.
If you are not able to catch me live, you can watch over on YouTube. If the picture does not appear below, you can click HERE to get to it on YouTube.
First up is one my favorite things to make - a box! Specifically, a pizza box custom-sized to hold a gift card. I also made a slanted insert, so the gift card can sit up on it at an angle, and be easily picked up.
Stamp the background using “merry christmas” in alternating colors - Pool Party and Real Red. Hand-cut a candy cane from the Sweetest Christmas DSP, and glue that down flat to the layered circles. Circle are all popped up with Stampin’ Dimensionals.
Paper measurements:
- Real Red: 6” x 8 1/2”
- Sweetest Christmas Designer Series Paper: 2 1/2” x 3 3/4”
- Real Red: 2 1/2” circle
- Basic White: 2 1/4” circle
- Basic White: scrap to back behind candy cane (cut from Sweetest Christmas DSP)
- Real Red: 3 7/8” x 3 7/8” (for inside of box - NOTE, I changed this measurement from the video)
Pattern shows scoring to make the pizza box. Start out with 6” x 8 1/2”piece. Score short side at 1”, and 5”. Score long side at 1”, 3 3/4”, 4 3/4”, and 7 1/2”.
Take the 3 7/8” x 3 7/8” piece of Real Red, and score in 1/2” from one end, and 3/4” in from the opposite end. This makes a slanted insert to sit your gift card on. Makes it easier to grab it out of the little box.
Stamps: Framed & Festive
Ink: Pool Party, Real Red
Paper: Real Red, Basic White, Sweetest Christmas designer series papers
Other: 2 1/4” & 2 1/2” circle punches, Seasonal Sequins
Next, I made a holder out of one of North Pole Sacks - an Add-On product for this month’s Paper Pumpkin kit. These 4” x 6” bags are food safe, and only $4.00 for (12) bags!
Fold the bottom of the bag up 1 1/2” inches. Add a strip of Tahitian Tide embossed layer, that I wrapped some Tahitian Tide Glimmer trim around first. Glue that down, and glue the very outside edges closed to make that pocket. The gift card fits landscape or portrait, but it was a little tight going landscape.
I made a little card to fit inside. Used the same Brick & Mortar embossing folder to layer. I stamped a group of the Party Puffins and colored them in with Stampin’ Blends markers. Hand-cut all of them, and add to the card front, and front of the sack pocket. Run the Clear Wink of Stella marker all over them.
Paper measurements:
- Tahitian Tide: 4” x 7”, scored in half at 3 1/2”
- Tahitian Tide: 3 1/4” x 3 3/4”, embossed with Brick & Mortar folder
- Tahitian Tide: 1 1/4" x 4", embossed with Brick & Mortar folder
- Basic White: 3 1/4” x 3 3/4”
- Basic White: 4 1/4” x 5 1/2”, notched corner to stamp and cut Party Puffins and greeting.
Greetings are both from the Framed & Festive stamp set - available now through Jan 4, 2023 (or while supplies last).
Stamps: Framed & Festive, Party Puffins
Ink: Tahitian Tide, Midnight (Catherine Pooler)
Paper: Tahitian Tide, Basic White
Other: North Pole Sacks, Brick & Mortar embossing folder, Tahitian Tide Glimmer ribbon, 2022-2024 In Color Matte Dots, Clear Wink of Stella markers, Stampin’ Blends (Tahitian Tide, Parakeet Party, Sweet S
The tri-fold bit has an embossed layer on the front, then it opens to reveal (2) stamping panels and a pocket. I also show you how/where to use magnets to keep this closed. You could also tie ribbon around the tri-fold part to tie it shut. Do that BEFORE you glue it down.
Magnets that I use: (this is an affiliate link) Round Slim Disc Magnets 3/8" x 1/32 - 200 Pack: https://amzn.to/3b8p7Pk
Paper measurements for the Center Step cards:
- Garden Green: 4 1/4” x 5 1/2”
- Sweetest Christmas Designer Series Paper: 4” x 5 1/4”
- Early Espresso: 2 5/8” circle, cut from Layering Circles dies
- Basic White: 2 1/2” swirly embossed circle, cut from Beautiful Shapes dies
- Garden Green: 3” x 4”, embossed with Whimsical Trees folder
- Garden Green: 4 1/4” x 9 5/8”, scored at 3 1/4” and 6 1/2”
- Basic White: (2) 3” x 4”. (I only stamped on one of these in my sample, but I planned for two.)
- Basic White: 4 1/4” x 5 1/2”, notched corner to stamp/punch reindeer and greeting (although I did not add a greeting)
- Garden Green: 1 1/4” x 4” to make pocket. Glue along 2 side, and bottom (3 sides) to make pocket.
Finish off with a bow tied with Silver Threaded Twine, and some Champagne Rhinestones.
Stamps: Peaceful Deer
Ink: Garden Green, Early Espresso, Crumb Cake
Paper: Garden Green, Early Espresso, Basic White, Sweetest Christmas Designer Series Paper
Other: Deer Builder Punch, Layered Circles dies, Beautiful Shapes dies, Whimsical Trees embossing folder, Silver Threaded Twine, Champagne Rhinestones
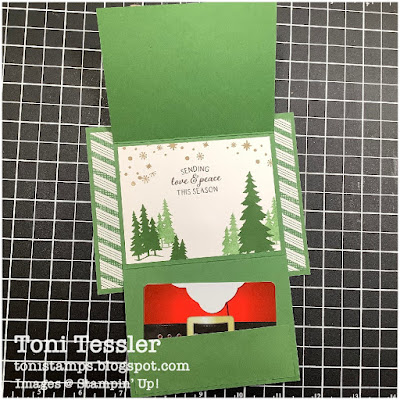
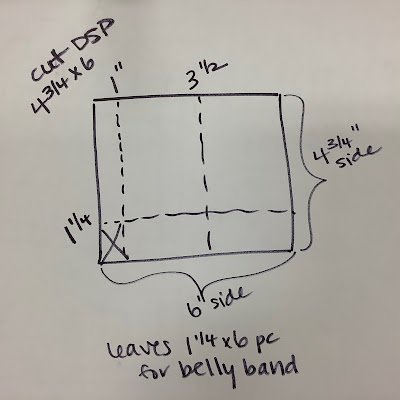
Lastly, I made a small folded double pocket holder, using ONE piece of 6” x 6” Painted Christmas designer series paper. Start by cutting your paper to 4 3/4” x 6”. You’ll need that 1 1/4” x 6” strip left over for the belly band.
Pattern to cut/score. Score on the 6” side at 1”, and 3 1/2”. Turn your paper one turn to the right, and score at 1 1/4”.
You will need to cut off that bottom corner marked by an X. ALSO snip out a small “V” from the center. Glue the sides up to make two pockets. (Sorry I didn’t get a picture of that, but you can watch it in the video.)
Paper measurements for the Side Step cards:
- Painted Christmas Designer Series Paper: 6” x 6”
- Shaded Spruce: scrap punched with Label Me Lovely punch
- Crumble Cake: 1 3/4” circle
- Pear Pizzazz: scraps to punch out with Bough punch
Note: If you don’t want two pockets - cut one off!
You’ll want to at least add a place holder gift card before you wrap your belly band around and secure it. Make sure you can easily slide the belly band over.
Stamps: Framed & Festive
Ink: Shaded Spruce
Paper: Crumb Cake, Shaded Spruce, Pear Pizzazz, Painted Christmas designer series papers
Other: Label Me Lovely punch, 1 3/4” circle punch, Bough punch, Red Rhinestones
I hope this gives you a few new ideas for how to give out your gift cards, and don’t forget - you can always take these dimensions and change out the colors/papers/stamps to make any theme you want. Birthday gift? Got it! Wedding gift? Yep. Baby Shower? Yes, indeed. Change it up!
Most importantly - please don't forget about my Wreaths Across America Fundraiser! Click on my Workshop of the Month page for full details of how to sponsor some wreaths! I do need everyone’s help to meet my goal.
Thanks for visiting, and Happy stamping!
Toni
Shop here for your Stampin' Up products, 24/7. Thank you for your support!
Paper Pumpkin Monthly Craft Kits
Facebook Page: @tonistampsandmore
Facebook Sharing Group: Toni's Stamping & Sharing Group
Instagram: tonistampsandmore
Pinterest: tonistamps
YouTube Channel: tonistamps
#tonistamps #stampinup #virtualstampingworkshop #wreathsacrossamerica #donatewreaths #waa
Gift certificates available anytime!


No comments:
Post a Comment