
We made it to the weekend, Crafty Friends! And it's a new year! Hooray!
I demonstrated my January 2021 Virtual Workshop on Thursday night, and I love these cards! I like to start the year off with Birthday cards, so the theme for this workshop is "Birthday Bash!". I always have good intentions of starting off the year getting birthday cards mailed out in time...I'm not always successful at that for very long. I know that's a shame, considering how many cards I MAKE. I've used products from the NEW January-June and SAB catalogs, as well as the Annual Catalog.
Click on my Workshop of the Month page for full details and this month's free gift from me!
Just a reminder that I am Live on-line every Thursday at 8:00pm ET. I am streaming to BOTH YouTube and Facebook simultaneously! SWEET!

If you are not able to catch me live, you can watch over on YouTube. If the picture does not appear below, you can click HERE to get to it on YouTube.
I always try to design these workshop cards so that you can use ANY stamps that you have on hand. So when you see me use a flower - look for something similar in your stash. I think the only tricky one this time will be the van that I used on the first card...but ANY image that you can do the "Paper Piecing" technique on will fit there. It could be a sail boat, a bike, a kit, another flower, a pair of boots...any image that will fit in that space will work.
You may notice that I'm using the NEW Iridescent Rhinestones on every project. That's because that's the freebie for this month for your qualifying purchase, using the Hostess Code!
Let's start with the first project. This card has a LOT of personality! It's got the paper piecing technique on the van, and it's got a neat flip out!
The Paper Piecing technique is an oldie, but goodie. I don't use it that often, and I need to bring it out more. Here's a tried-and-true tutorial from splitcoaststampers. The short version of this technique is:
- stamp your image on a neutral cardstock.
- stamp the same image on a piece of patterned/colored paper.
- cut out the part of the image that you want from the patterned/colored paper.
- glue that on top of the image that you stamped on your neutral piece first.
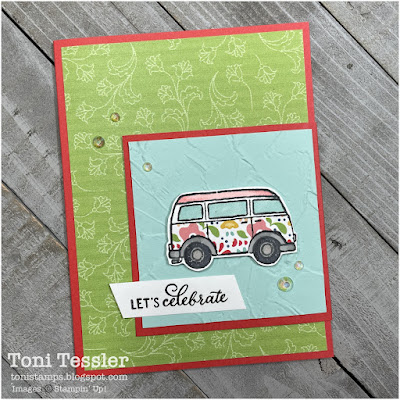
Here's a close-up picture of the van - I only cut the main body of the van out of the patterned paper. Then I colored in the wheels, windows, and roof with various Stampin' Blends. Gave the windows and wheels a few swipes with the Wink of Stella marker.
The adorable van is from one of the Sale-a-Bration items. This set is free with your $50 purchase. Get yours soon!


All the way open -

Paper measurements:
- Poppy Parade: 5 1/2" x 8 1/2", scored in half at 4 1/4".
- Pattern Party DSP/Granny Apple Green print : 4" x 5 1/4"
- Basic White: 4" x 5 1/4" (for inside of card)
- Poppy Parade: 3 1/2" x 3 1/4", scored at 1/4" so you have a 3 1/2" x 3 1/2" flap.
- Pool Party: 3" x 3", embossed with Painted Textures folder
- Basic White: 3" x 3", for back of flip
Greeting is from Peaceful Deer. Stamped in black, and hand-cut. Glued down flat to the flip part. Finish off with a BUNCH of the beautiful Iridescent Rhinestones.
Stamps: Driving By (Sale-a-Bration set, only available through 2/28/2022), Peaceful Deer
Ink: Midnight (Catherine Pooler), Onyx Versafine
Paper: Poppy Parade, Pool Party, Basic White, Pattern Party Designer series papers
Other: Painted Texture embossing folder, Stampin' Blends (Basic Black, Smoky Slate, Gray Granite, Coastal Cabana, Flirty Flamingo), Wink of Stella marker, Iridescent Rhinestones
Next project is based on something I saw on Facebook from MyStampGarden. I went back to look at it after, and this is quite different. But the original idea was a great starting point for me! This is kind of a grungy vintage-y look, and I just kept going further and further with it.
The background layer is embossed with the new Hive folder, crunched up, and then inked the edges directly with my Soft Suede ink pad. Flatten/smoosh it out and glue to the card base.
Then I had three stitched rectangles that I stamped on, and popped up with foam tape. Glue on a pile of flowers/stems/weeds in greens and browns.


Paper measurements:
- Early Espresso: 5 1/2" x 8 1/2", scored in half at 4 1/4".
- Very Vanilla: 4" x 5 1/4" (for inside of card)
- Soft Suede: 4" x 5 1/4", embossed with Hive folder
- Soft Suede: (3) stitched rectangles, approx 1 1/4" x 3 3/8"
- Very Vanilla: scrap to die cute label
- Soft Seafoam/Pear Pizzazz/Old Olive/Crumb Cake: scraps to die cut foliage
After I attached the greeting, I added quite a few Brushed Brass Butterflies (they are FLAT!), and of course...some more Iridescent Rhinestones1
Stamps: Amazing Silhouettes, Quiet Meadows, Shaded Summer
Ink: Soft Suede, Early Espresso
Paper: Early Espresso, Soft Suede, Old Olive, Pear Pizzazz, Soft Seafoam, Crumb Cake, Very Vanilla
Other: Stitched Rectangle dies, Meadow dies, Brushed Butterflies, Iridescent Rhinestones, Crochet trim, Ball pin (Joann's)
For my third project, I was still in the mood for flowers. I thought the Hello, Friend Sale-a-Bration stamp set and the Art in Bloom set would go together nicely. They do! Perfectly, in my opinion.
I first embossed a Pale Papaya layer with the Timeworn Type folder. Then I embossed a piece of vellum with the Bloom hybrid embossing folder, to go on top of that. Texture on top of texture. Love it!
Then I stamped flowers from Art in Bloom (Pale Papaya ink on Pale Papaya paper), and Hello Friend (black ink on Basic White paper). Then cut them with dies, or hand-cut.
I ink blended some Pale Papaya in the centers of the white flowers...it smeared a little. :(


Paper measurements:
- Pale Papaya: 5 1/2" x 8 1/2", scored in half at 4 1/4".
- Basic White: 4" x 5 1/4" (for inside of card)
- Pale Papaya: 4" x 5 1/4", embossed with Timeworn type folder
- Vellum: 3 3/4" x 5", embossed with Bloom Hybrid embossing folder
- Pale Papaya: 4 1/4" x 5 1/2", notched corner to stamp/cut flowers
- Basic White: 4 1/4" x 5 1/2", notched corner to stamp/cut flowers, tiny flowers, and greeting
- Soft Seafoam: scraps to die cut some leaves
Ink blend the edges of the greeting ticket, and then build up all of the flowers and greeting with glue and Stampin' Dimensionals. Some things are glued flat, some are popped up.
I tied a double bow using Pale Papaya and White Crinkled seam binding. I do like using more than one ribbon together. Again, finish off with a few Iridescent Rhinestones.
Stamps: Hello, Friend (Sale-a-Bration item free with$100 purchase), Art in Bloom
Ink: Pale Papaya, Onyx Versafine
Paper: Pale Papaya, Soft Seafoam, Basic White, Vellum
Other: Timeworn Type and Bloom Hybrid embossing folders, Bloom dies, Pale Papaya Open Weave ribbon, Whisper White Crinkled ribbon, Wink of Stella marker, Iridescent Rhinestones
Stamp the mountains first, in Rich Razzleberry, then the tree line in Misty Moonlight/Night of Navy.
Ink blend starting at the bottom with Misty Moonlight, then some Polished Pink in the middle between the moutains and trees, and then Rich Razzleberry at the top. It ended up looking like a storm...but I like it!

Paper measurements:
- Rich Razzleberry: 5 1/2" x 8 1/2", scored in half at 4 1/4"
- Misty Moonlight: 3 7/8" x 5 1/8"
- Basic White: 3 3/4" x 5"
- Basic White: 4" x 5 1/4" (for inside of card)
- Rich Razzleberry: 2 1/2" circle
- Misty Moonlight: 2 1/4" circle, embossed with Macrame folder
- Cinnamon Cider: scrap to punch out deer, embossed with Tasteful Textiles folder
I punched a deer out of Cinnamon Cider and embossed him with the Tasteful Textiles folder. Then punch a 2 1/4" circle out of Misty Moonlight, and emboss with the Macrame folder. Layer that onto a 2 1/2" circle of Rich Razzleberry.
Greeting was stamped on a scrap of Whtie, with Night of Navy ink and hand-cut. The deer and the greeting are the only things popped up.
Stamps: Mountain Air, Artistic Expressions
Ink: Rich Razzleberry, Misty Moonlight, Night of Navy, Polished Pink
Paper: Rich Razzleberry, Misty Moonlight, Cinnamon Cider, Basic White
Other: Macrame and Tasteful Textiles embossing folders, 2 1/4" and 2 1/2" circle punches, Deer punch, Iridescent Rhinestones
I hope that you are as happy with these birthday cards as I am! I actually have several January birthdays to send cards out for.
Reminder that my January Online Class will air live this coming Monday (1/10), and Tuesday (1/11) nights at 8:00pm ET. See you on either Facebook or YouTube!
Thanks for visiting, and Happy stamping!
Toni
Shop here for your Stampin' Up products, 24/7. Thank you for your support!
Paper Pumpkin Monthly Craft Kits
Facebook Page: @tonistampsandmore
Facebook Sharing Group: Toni's Stamping & Sharing Group
Instagram: tonistampsandmore
Pinterest: tonistamps
YouTube Channel: tonistamps
#tonistamps #stampinup #januaryworkshop #birthdaycards
Gift certificates available anytime!
No comments:
Post a Comment