Hello Craft Friends! I hope you've had a great weekend so far. Today I'm sharing the projects that I made on Thursday night featuring the Fragrant Forest stamp. It's a background stamp, but I think it can serve as both a background and as a main focal point. Maybe you have something similar in your stash that you can use to copy my designs!
Just a reminder that I am generally Live on-line every Thursday at 8:00pm ET. I stream to BOTH YouTube and Facebook simultaneously.
If you are not able to catch me live, you can watch over on YouTube. If the picture does not appear below, you can click HERE to get to it on YouTube.
First card is a Faux Center Step card. I LOVE, love, LOVE these faux step cards. They're sturdier than a traditional step card, with the extra layer of cardstock, and much easier to actually make. For this card, I was going for a Smoky Mountain vibe. I stamped the trees is Misty Moonlight, and then ink blended some Smoky Slate and Petal Pink inks all over. I know it's NOT really the Smoky Mountains, but it makes me think of them when I look at this.
The center panel has the trees, then I added some Country Woods dsp to some of the other panels.
Paper Measurements:
Stamps: Fragrant Forest, Well Said
Ink: Misty Moonlight, Petal Pink, Smoky Slate
Paper: Misty Moonlight, Basic White, Country Lace Designer Series paper
Other: Tinsel Gems Three-pack
The second card is a muti-step process of adding ink to the Fragrant Forest stamp, direct ink pad to stamp, then blending out the harsh lines or edges with blending brushes. You'll definitely need a stamp positioning tool of some kind - either the Stamparatus or a MISTI. Keep adding color and blending until you've got a multi-colored forest. It looked like a hot mess until I got that last layer of color on it. I think it's a beautiful result.
Paper Measurements:
- Copper Clay: 5 1/2" x 8 1/2", scored at 4 1/4"
- Basic White: (2) 4" x 5 1/4", one for the inside
- Copper Clay: scrap to cut circle with Spotlight on Nature dies
- Basic White: 1 3/4" circle punch
Add some of the Pecan Pie Ribboned Adhesive Dots to finish.
Stamps: Fragrant Forest, More than Autumn Bundle
Ink: Copper Clay, Wild Wheat, Old Olive, Cherry Cobbler, Crushed Curry
Paper: Copper Clay, Basic White
Other: Spotlight on Nature dies, 1 3/4" Circle punch, Pecan Pie and Clear Ribboned dots
Third project is a Christmas card. This time, I've used the Fragrant Forest as a background, and then added some Cherry Cobbler layers and some die-cut trees. I think this could also be an all-occasion card - change the colors and the greetings, and it can be used for anything!
Paper Measurements:
- Shaded Spruce: 5 1/2" x 8 1/2", scored at 4 1/4"
- Shaded Spruce: 4" x 5 1/4"
- Basic White: 4" x 5 1/4", for inside of card
- Shaded Spruce: scrap to die-cut trees from Forever Forest dies
- Cherry Cobbler: 3" x 4", rip the top and bottom edges
- Cherry Cobbler: 2 1/4" x 4"
- Basic White: scrap to stamp greeting
I added some of the Pretty Peacock Foiled Gems to finish. They look good enough against the Shaded Spruce.
Stamps: Fragrant Forest, Greetings of the Season, Sketched Plaid
Ink: Shaded Spruce, Cherry Cobbler
Paper: Shaded Spruce, Cherry Cobbler, Basic White
Other: Forever Forest dies, Pretty Peacock Foiled Gems
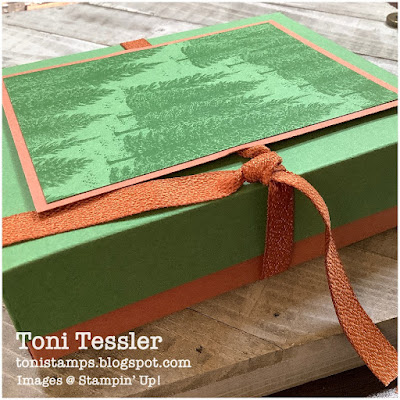
The last project is a box, that should hold at least 10 cards and envelopes, A-2 size. The finished box is 4 1/2" x 5 3/4" x 1 1/2" tall. Plenty of room! This is a two-piece box, meaning there is a box bottom, and a box top. I like to make the box bottoms a little bit taller than the top, so that you can see both colors. You also don't have to make any thumb hole punches on the box top with this style.
And obviously, you don't HAVE to put cards in this box. I designed this box to hold A-2 cards, but you can put whatever fits inside.
Paper Measurements:
- Copper Clay: 7 7/16" x 8 11/16", scored at 1 1/2" on all four sides
- Garden Green: 6 1/2" x 7 3/4", scored at 1" on all four sides
- Copper Clay: 3 1/2" x 4 3/4"
- Garden Green: 3 1/4" x 4 1/2"
Side view, so you can see the box bottom.
I didn't add any gems or greeting to the box, but you could certainly do that. I left my ribbon long, so I can un-tie it, add whatever to the box, then re-tied it and then I'll trim it down.
Stamps: Fragrant Forest
Ink: Garden Green
Paper: Poppy Parade, Basic Beige, Basic White (Thick and Regular), Sentimental Christmas Designer Series Paper
Other: Copper Clay Textured Ribbon
I hope you enjoyed these projects, and can use an idea or two in your crafting. This coming Thursday, I'll be making a Christmas-themed Flip Book (similar to this Halloween one that I made https://youtu.be/hpkD5q19Zps)
NOTE that I will not have a video on Halloween. I need to hand out candy to the trick-or-treaters.
Thanks for visiting, and Happy stamping!
Toni
Shop here for your Stampin' Up products, 24/7. Thank you for your support!
*NEW* Toni's Amazon Store - shop for my favorite crafting items
Paper Pumpkin Monthly Craft Kits
Facebook Page: @tonistampsandmore
Facebook Sharing Group: Toni's Stamping & Sharing Group
Instagram: tonistampsandmore
Pinterest: tonistamps
YouTube Channel: tonistamps
#tonistamps #stampinup #fragrantforest #makeyourownbox
Gift certificates available!


No comments:
Post a Comment